As we head toward the end of the semester, you have probably begun thinking about your Spring 2018 courses. We have blogged before about some of the helpful features in Blackboard that make preparing for a new semester easier: copying materials into your new courses, setting availability and due dates efficiently, and exporting or archiving your older courses for safe-keeping.
Likewise, making tweaks to your syllabus, updating your assignment descriptions, or replacing older presentations with a new ones can also eat up valuable time. In this post, you will find a quick way to replace older files and documents with new ones using the "Overwrite File" option in the Content Collection.
First, some helpful background information: each document you upload to Blackboard is automatically added to the Content Collection. For example, you will find a copy of your syllabus in the Content Collection if you have added it somewhere in your course.
Blackboard uses the file in the Content Collection as the source for the link in your course. In other words, the file attached in figure "A" is only a link to that file in the Content Collection, depicted in figure "B". The Content Collection is where the file "lives" - the link provided in the course simply points to the file in the Content Collection.
Therefore, by overwriting the file in the Content Collection, you can update all links to this file in the course.
Locate the file you wish to replace, and click the grey drop-down button to access the options menu.

Select "Overwrite File" and, on the following screen, "Browse..."

Select the updated file from the appropriate directory on your computer. In this case, an updated syllabus is the target file.

You will receive confirmation that the file was successfully overwritten at the top of the window.

Now, all links within the course pointing to the original file will download the updated file. You can repeat this process for any file in the Content Collection, which eliminates the need to navigate to each individual section of your course to update course content.
Note that overwriting older files with new ones does not change the original filename or the Link Titles in the course.
In our example, our original filename was "HMXP 201 019 Fall 2017." Though we overwrote this file with a file named "HMXP 201 019 Spring 2018", the filename and existing links will still read "HMXP 201 019 Fall 2017" unless they are manually edited.
If you need to update your filenames for accuracy, follow the steps below.
To rename the file itself, navigate back to the file in the Content Collection, open the options menu, and select "Edit Settings."


Update the filename in the first field, and submit your changes.

You will find the filename updated in the Content Collection.


You can update the Link Title under the Attachments section of the Edit Screen.

If you have any questions about managing files in your Content Collection, please reach out to us at instructionaldesign@winthrop.edu. For more information about Blackboard, please visit our website at https://www.winthrop.edu/onlinelearning.
Likewise, making tweaks to your syllabus, updating your assignment descriptions, or replacing older presentations with a new ones can also eat up valuable time. In this post, you will find a quick way to replace older files and documents with new ones using the "Overwrite File" option in the Content Collection.
First, some helpful background information: each document you upload to Blackboard is automatically added to the Content Collection. For example, you will find a copy of your syllabus in the Content Collection if you have added it somewhere in your course.
 |
| A. Syllabus as it appears in a content area |
 |
| B. Syllabus file housed in the Content Collection |
Blackboard uses the file in the Content Collection as the source for the link in your course. In other words, the file attached in figure "A" is only a link to that file in the Content Collection, depicted in figure "B". The Content Collection is where the file "lives" - the link provided in the course simply points to the file in the Content Collection.
Therefore, by overwriting the file in the Content Collection, you can update all links to this file in the course.
Overwriting Files in the Content Collection
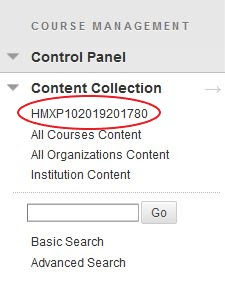
First, navigate to the content collection for your course by selecting the course ID in the Content Collection tab of the Control Panel.
Locate the file you wish to replace, and click the grey drop-down button to access the options menu.

Select "Overwrite File" and, on the following screen, "Browse..."
 |

Select the updated file from the appropriate directory on your computer. In this case, an updated syllabus is the target file.

You will receive confirmation that the file was successfully overwritten at the top of the window.
Now, all links within the course pointing to the original file will download the updated file. You can repeat this process for any file in the Content Collection, which eliminates the need to navigate to each individual section of your course to update course content.
Addressing Filenames
Note that overwriting older files with new ones does not change the original filename or the Link Titles in the course.
In our example, our original filename was "HMXP 201 019 Fall 2017." Though we overwrote this file with a file named "HMXP 201 019 Spring 2018", the filename and existing links will still read "HMXP 201 019 Fall 2017" unless they are manually edited.
If you need to update your filenames for accuracy, follow the steps below.
Renaming Files in the Content Collection
To rename the file itself, navigate back to the file in the Content Collection, open the options menu, and select "Edit Settings."


Update the filename in the first field, and submit your changes.

You will find the filename updated in the Content Collection.
| Updated Filename in Content Collection |
Renaming Links Titles in Content Areas
To update Link Title in your content areas, navigate to the appropriate content area. Using the drop-down button, enter the "edit" menu for the item.

You can update the Link Title under the Attachments section of the Edit Screen.

If you have any questions about managing files in your Content Collection, please reach out to us at instructionaldesign@winthrop.edu. For more information about Blackboard, please visit our website at https://www.winthrop.edu/onlinelearning.
Comments
Post a Comment