When your course is created in Blackboard, it is created with a default course menu. While this menu can be useful as is, customizing the menu can help you create more intuitive navigation for your learners.
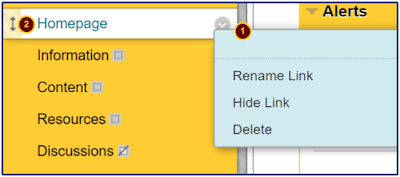
[1] To begin, hover over one of the items on your course menu and click the drop-down arrow. Here you are able to rename, hide, or delete the link. Delete any items you don't need. Do note if you delete a content folder containing content, you will also delete that content.
[2] To reorder the course menu, hover over an item and click on the up-down arrow beside the item you want to move until. Drag and drop the item in its new location on the course menu.
(Note: If you're having issues moving items on the course menu, first try to clear your browser's cache, close the browser, and reopen Blackboard: How to clear your cache in Chrome, How to clear your cache in Firefox)
[3] You may also add a variety of items to your course menu. You may link to a content area page or folder, learning module, or any other item or activity you’ve created in another area of the course.
You may also link to Blackboard tools. A link to the discussion board is already created for you, but consider adding a link to other course tools such as Announcements, Blackboard Collaborate Ultra, Calendar.
Click the blue plus sign in the top left of the menu in order to add items. Any new item you add to the menu will automatically be added to the end of the menu.
[4] Finally, consider using the subheader and divider features in order to organize your menu content. You may create a section on course resources, course tools, divide items by units, or create other organizing headers.
[1] To begin, hover over one of the items on your course menu and click the drop-down arrow. Here you are able to rename, hide, or delete the link. Delete any items you don't need. Do note if you delete a content folder containing content, you will also delete that content.
[2] To reorder the course menu, hover over an item and click on the up-down arrow beside the item you want to move until. Drag and drop the item in its new location on the course menu.
(Note: If you're having issues moving items on the course menu, first try to clear your browser's cache, close the browser, and reopen Blackboard: How to clear your cache in Chrome, How to clear your cache in Firefox)
You may also link to Blackboard tools. A link to the discussion board is already created for you, but consider adding a link to other course tools such as Announcements, Blackboard Collaborate Ultra, Calendar.
Click the blue plus sign in the top left of the menu in order to add items. Any new item you add to the menu will automatically be added to the end of the menu.
[4] Finally, consider using the subheader and divider features in order to organize your menu content. You may create a section on course resources, course tools, divide items by units, or create other organizing headers.
Below is a sample customized course menu with added links to content area pages for each unit, quick links to pages students will frequently visit, added resources for student support, and easily divided-out contact information.
For support customizing and designing your course menu, please don't hesitate to contact Winthrop's Instructional Designers. Visit our Contact Us page on the Office of Online Learning website to book a meeting.


Comments
Post a Comment